
Get the best out of your bike

Like any vehicle, a bike needs to be regularly checked and maintained. If you ride often, it’s worth checking over your trusty two-wheeled steed once a week to ensure everything’s in working order.
Information on basic checks and maintenance can be found in our Getting back on your bike article. If you’re more confident about your bike-tweaking skills, here are five adjustments that will help fix some common problems and improve your cycling experience.
1. Gears crunching
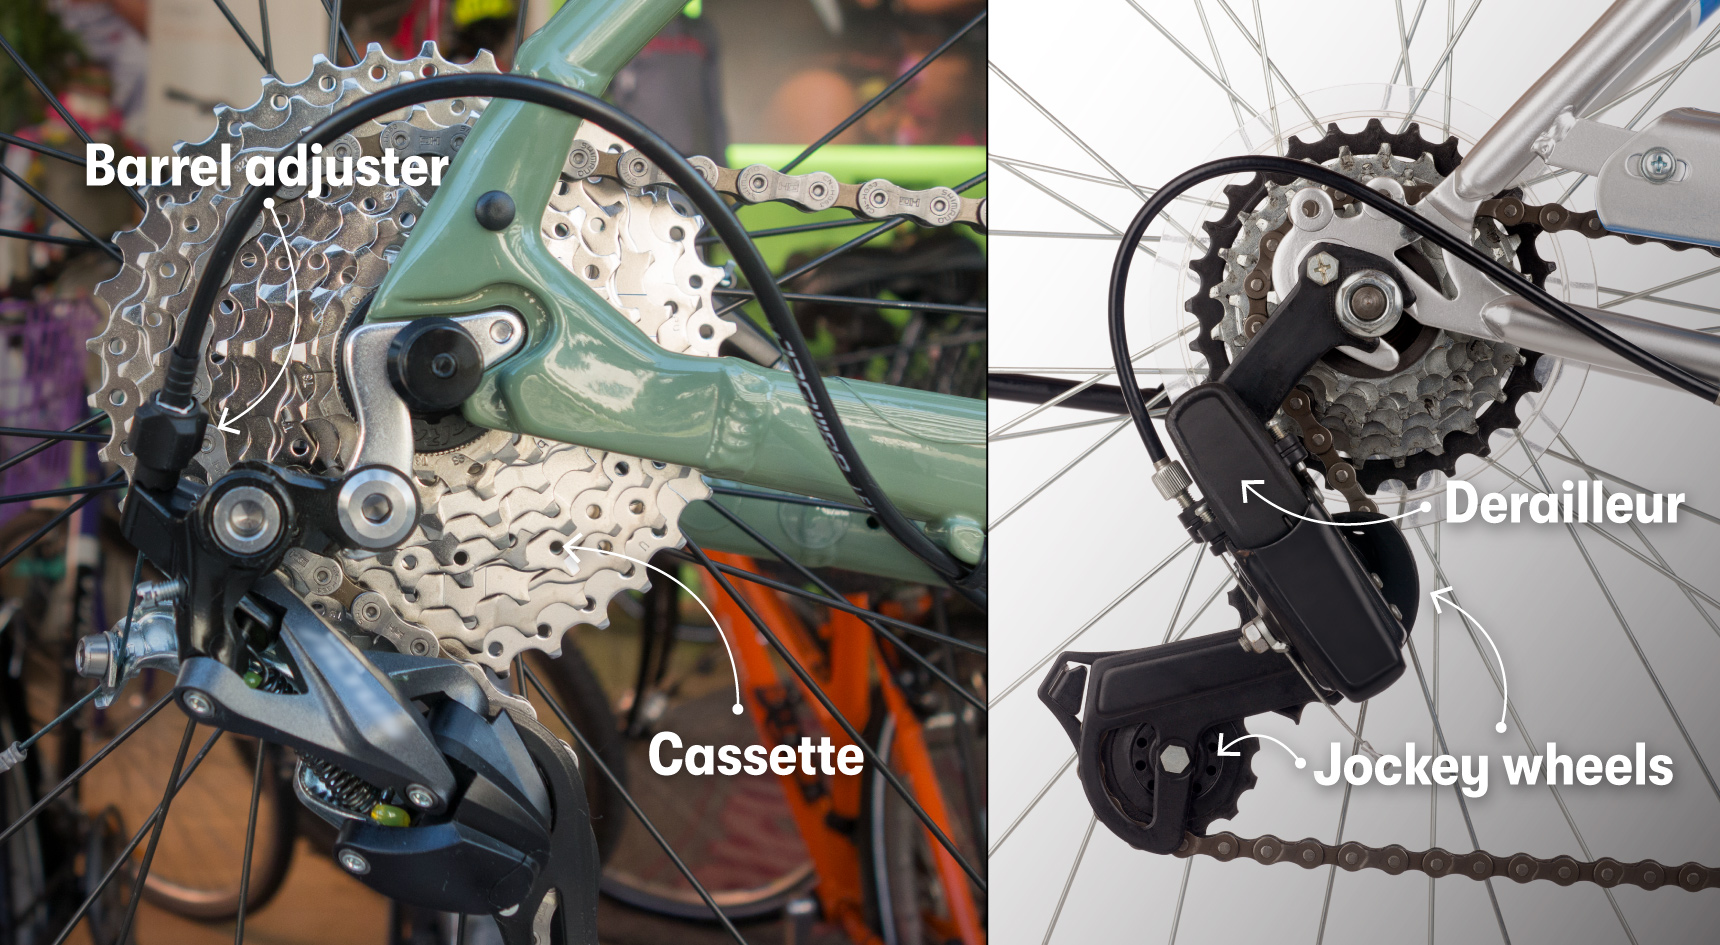
You head off on a ride and discover your rear gears, collectively known as a cassette, aren’t changing as smoothly as they once did. Over time, gear cables can develop slack and the little jockey wheels on the rear derailleur no longer line up under each gear.
At some stage you might need a new cable, but in the meantime you can make minor adjustments with the barrel adjuster, located either down at the rear derailleur or up at the gear shifter.
Turning the barrel adjuster anti-clockwise tightens the cable and moves the derailleur towards the wheel, while winding it clockwise loosens the cable and moves the derailleur towards the frame.
If the barrel adjuster is at the shifter, you can make the adjustment while you’re riding, but if it’s at the derailleur, you’ll need to place your bike on a stand so you can turn the back wheel while you’re working.
It’s best to make these tweaks with the chain on the middle cog of a three-chainring crankset (front gears), and the smaller ring on a two-ring system. There are plenty of YouTube videos showing the process.
If your bike has more than one chainring on the crankset, it’ll also have a barrel adjuster for adjusting the front derailleur.
2. Chain coming off the gear cassette
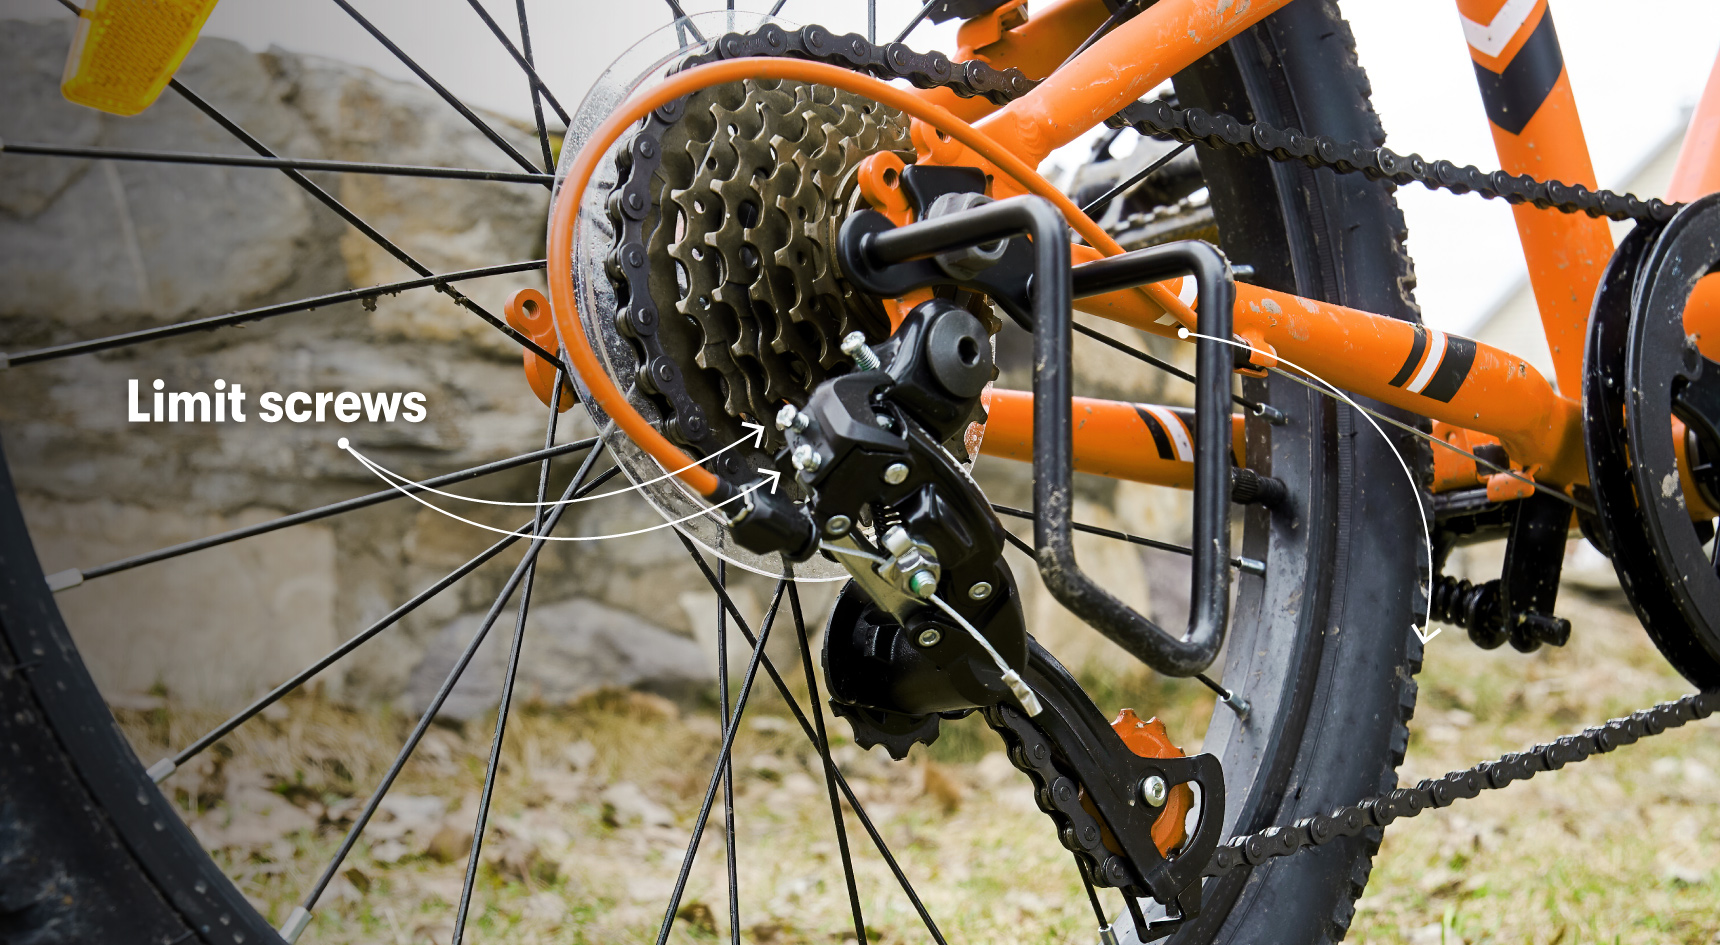
This can happen at the worst possible time – either when you’re grinding up a steep hill in your lowest gear, or scooting down the main road in the highest gear. A rear derailleur has two limit screws, which, when properly set, prevent the chain from jumping off the cassette cogs.
The high-limit screw, often marked with an H, can be adjusted to stop the chain falling off towards the frame, while the low-limit screw (L) stops the chain falling off towards the wheel.
The H screw should be adjusted with the chain on the smallest cog on the cassette and the biggest chainring on the crankset. The L screw is adjusted with the chain on the biggest cog on the cassette and the smallest chainring (if there’s more than one chainring).
From the rear, you’ll see the derailleur move as you turn the screw, so you’ll know whether you’re moving it in the right direction. This can take some fine tuning and a YouTube tutorial can be handy.
A bike with more than one chainring also has two limit screws for adjusting the front derailleur.
3. Seized seat
This is a quick one – hopefully. Occasionally you might need to adjust your seat height or remove the seat altogether to pack your bike into a vehicle. If you haven’t done this for a while, you could find the seat post has all but fused to the frame. Sometimes it can be stuck so firmly that even a good drenching of spray lubricant won’t get it to budge.
So, instead of waiting until the problem arises, remove the seat post while it’s possible and add a layer of grease to it. If the post and/or frame are carbon fibre, you may want to use carbon paste.
4. Off-kilter handlebars – quill-style headset
If your bike takes a tumble and your handlebars are knocked out of alignment, you’ll need to straighten them. Handlebars are attached to the forks via a headset, of which there are two main types – threaded and non-threaded.
Here, we’re dealing with the threaded quill-style, comprised of a long bolt that screws into a wedge-shaped nut, which sits in a tube extending from the forks.
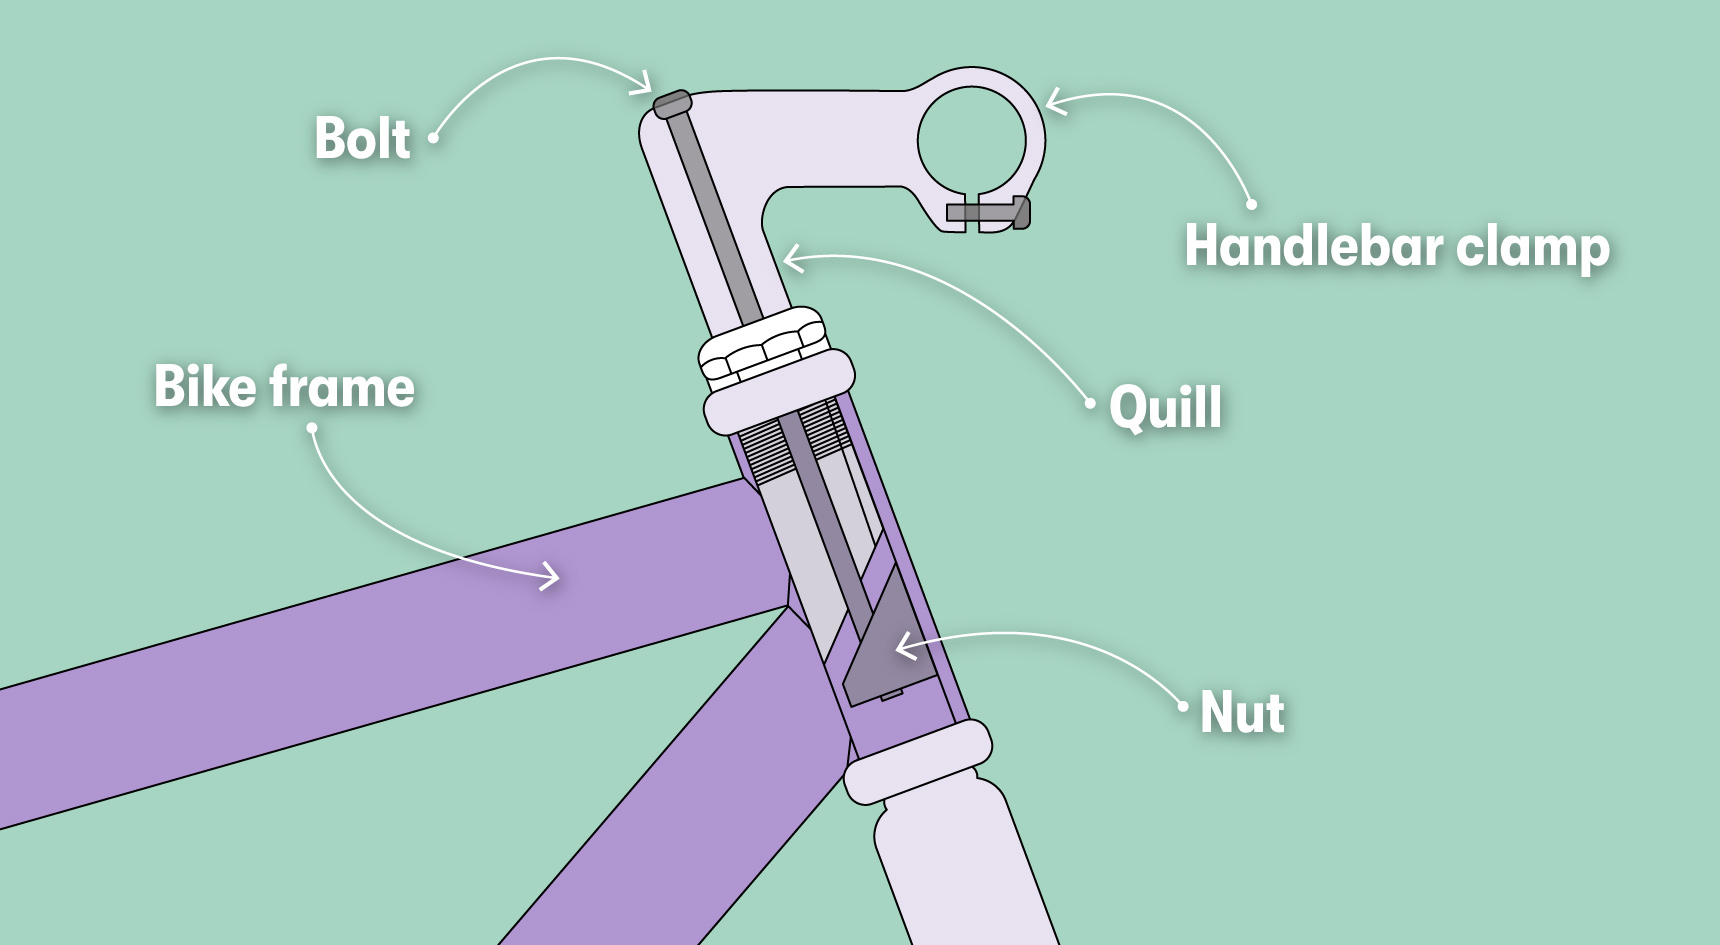
If you’re lucky, you can simply loosen the bolt (but don’t remove it completely from the nut) and straighten the handlebars. However, the nut could potentially be wedged so tightly that the headset won’t budge.
In this case, tapping the head of the loosened bolt with a hammer will usually dislodge the nut and free up the headset. Once you’ve realigned the handlebars, retighten the bolt and carry on.
5. V-brakes rubbing
Brakes come in two main flavours – disc and rim. Disc brakes are similar to car brakes and are comprised of a steel rotor at the hub and two small pads that pinch the rotor to stop the bike when the brake lever is squeezed. Rim brakes are like a clamp tipped with pads that directly grip both sides of the wheel rim when activated, to bring the bike to a stop.
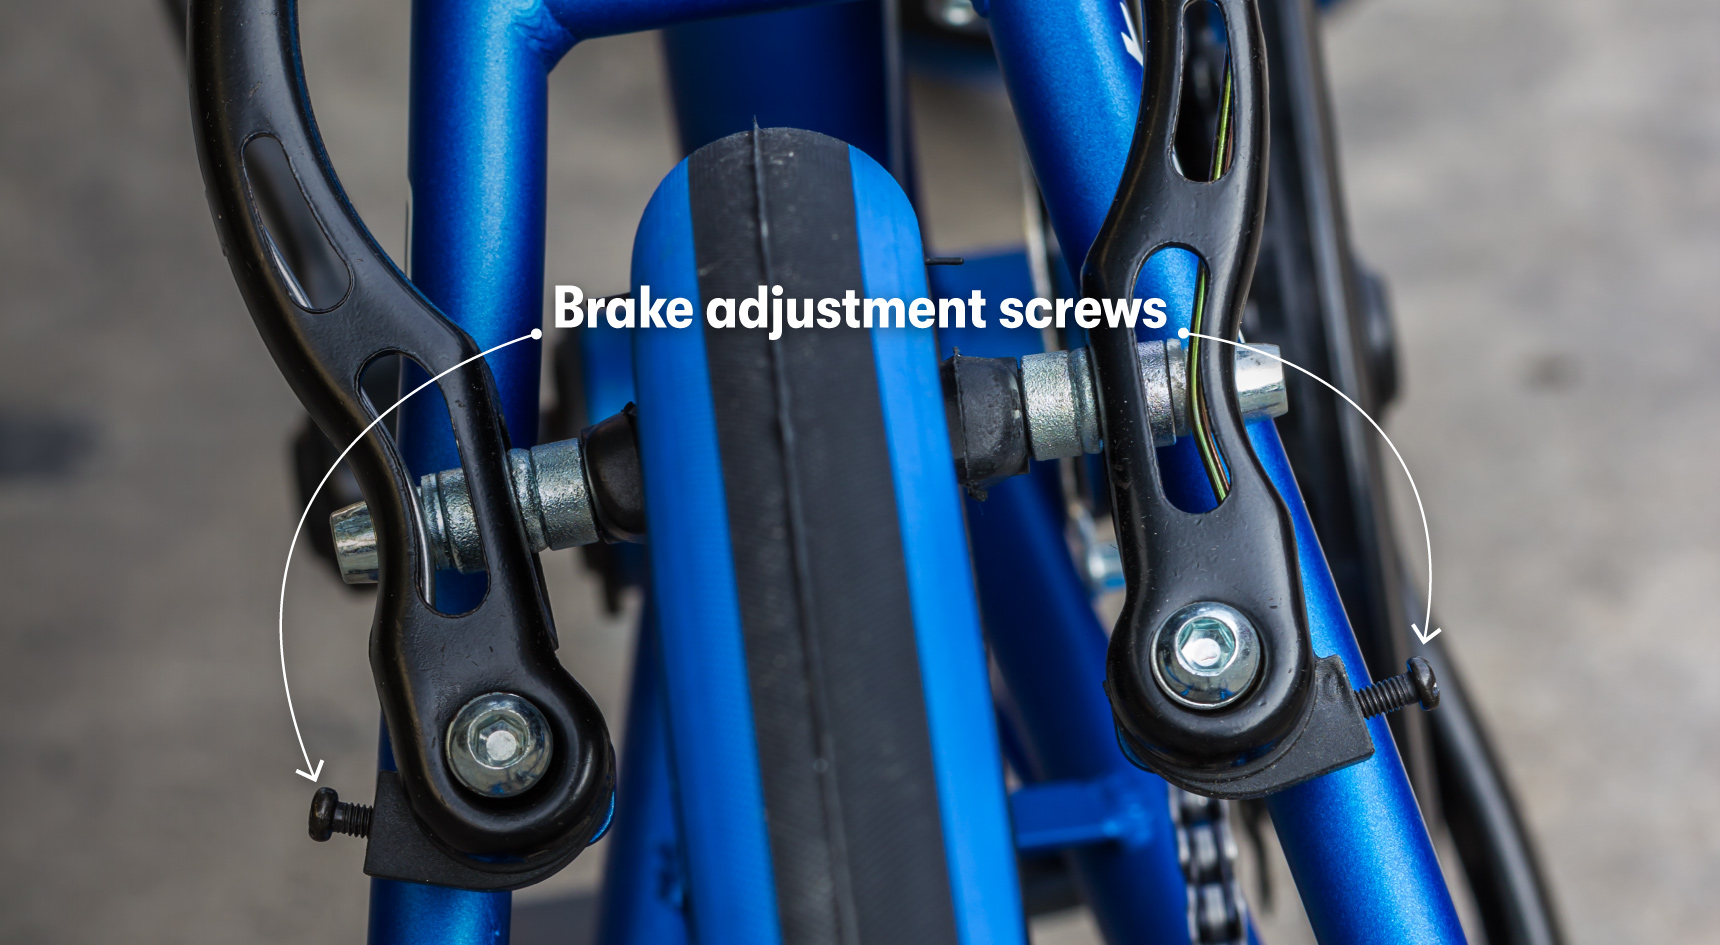
One of the most common types of rim brake is the V-brake. Occasionally you might find that one of the brake pads is rubbing on the wheel, even when the brakes aren’t applied. This could be because the wheel isn’t centred. In this case, loosen the wheel at the axle, centre it in the frame, and then firmly resecure it.
If the wheel is already centred, you can try moving the offending pad away from the rim by making an adjustment with the small screw shown below. Screwing it clockwise moves the pad away from the rim, while screwing it anti-clockwise moves the pad closer.
Each pad has its own adjustment screw, and you might need to adjust them both so the pads are an equal distance from the rim.
Get onya bike
RAA members get 5% off selected bikes and 10% off parts and accessories at Bike Express.